CS2 FPS Command: How To Show FPS in CS2
Whether you’re grinding Premier matches, warming up on aim maps, or playing casually with friends, frames per second (FPS) are the heartbeat of your game. If your FPS isn’t high and stable, you’re essentially playing at a disadvantage - shots might feel delayed, movements won’t look smooth, and enemies may appear less responsive.
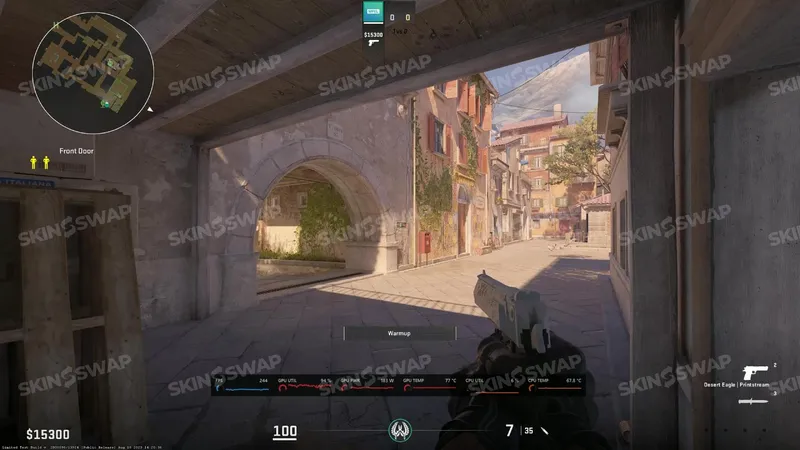
In Counter-Strike 2, Valve has reworked parts of the engine and added new systems like Telemetry, changing how you view performance data compared to CS:GO. That means the old methods still work in some cases, but there are also new tools worth mastering. The new telemetry system includes a feature for monitoring FPS and other in-game performance metrics, making it easier to troubleshoot issues and customize your display.
Why Monitoring FPS in CS2 Matters
What FPS Is and How It Affects Gameplay
FPS - or frames per second - measures how many individual images your PC renders every second during gameplay. If your PC can only push 40 FPS, you’re seeing fewer frames than someone running at 144 FPS, meaning:
- Animations are less fluid.
- You have fewer visual “updates” per second, slightly reducing your reaction potential.
- Micro-stutters become more noticeable, especially during fast turns or sprays.
In CS2, every millisecond matters. A smooth 144–240 FPS lets you react faster to peeks, track opponents with precision, and make split-second adjustments mid-fight. Lower FPS can cause:
- Delayed shot registration (perceived input lag).
- Choppy motion, making enemies harder to track.
- Frame drops at crucial moments (like smoke spam or utility explosions).
How to Tell if Your FPS Is Comfortable
While “comfortable” depends on your monitor and sensitivity to lag, here’s a practical breakdown:
- Below 60 FPS: Unpleasant for competitive play. Feels heavy and jittery.
- 60–100 FPS: Fine for casual games, but competitive players will feel limited.
- 100–144 FPS: Solid performance, matches well with most 144Hz monitors.
- 144–240 FPS: Competitive sweet spot. Ideal for top-tier matchmaking.
- 240–300+ FPS: Ultra-high refresh monitors (240Hz/360Hz) can make use of this, plus it smooths frame time variance.
Minimum and Optimal FPS for CS2
CS2 is more demanding than CS:GO due to Source 2 engine changes, but with proper optimization:
- Minimum for casual play: 60 FPS.
- Minimum for competition: 100–120 FPS.
- Optimal competitive target: 144–240 FPS.
- Pro-level target: 300 FPS to ensure the lowest frame times and input latency.
To achieve these, monitor your FPS regularly and adjust graphics settings before competitive matches.
Main Methods to Show FPS in CS2
There’s no single “best” method - each player’s setup and preferences differ. Most players use two methods to display FPS in CS2: using in-game commands or third-party overlays. These methods allow you to start displaying your FPS during gameplay for performance monitoring. Some like the minimalist cl_showfps counter, others prefer full telemetry with ping and server tick rate.
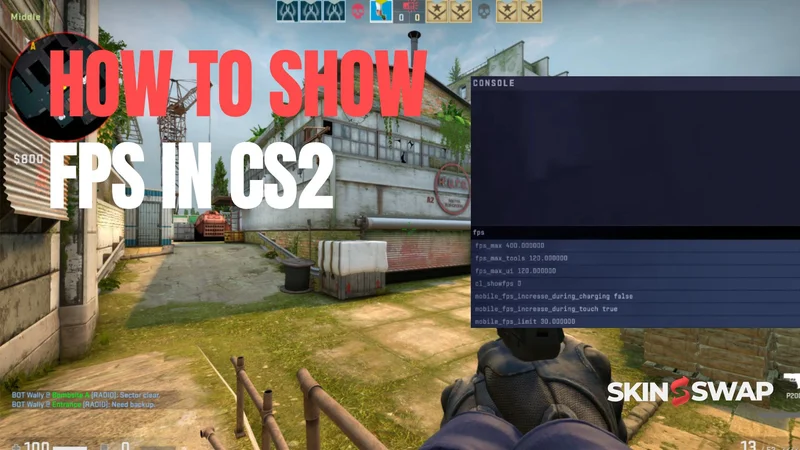
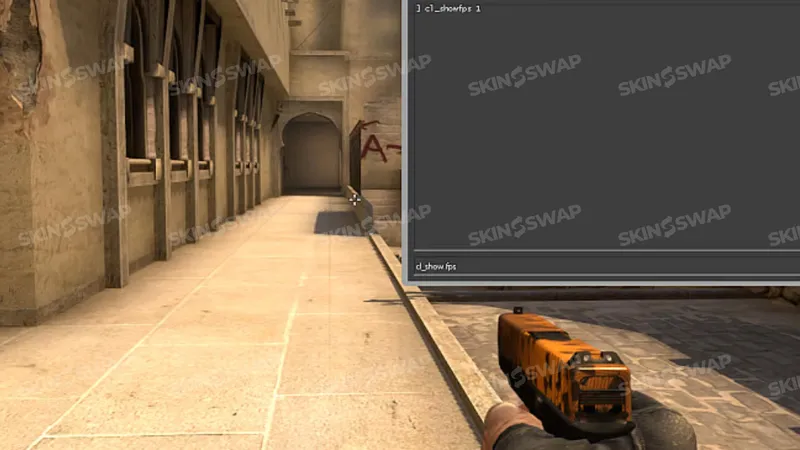
Using the Developer Console (cl_showfps 1)
Step-by-step:
- Enable console.
- Go to Settings → Game → Enable Developer Console and set to Yes.
- Open console with ~ (tilde key - may be under Esc).
Type: cl_showfps 1 and hit enter.
FPS will appear in the top-left corner in small text. This shows your current fps in real time.
To turn off, use: cl_showfps 0.
Pro tips:
- Some builds allow cl_showfps 2, 3, or 4 for slightly different info (FPS + server/simulation details).
- cl_showfps is lightweight and won’t noticeably affect performance.
- Perfect if you just want FPS without other distractions.
Common mistakes:
- Forgetting to enable Developer Console first.
- Typing command in lowercase vs uppercase - CS2 is case-insensitive, but typos will fail.
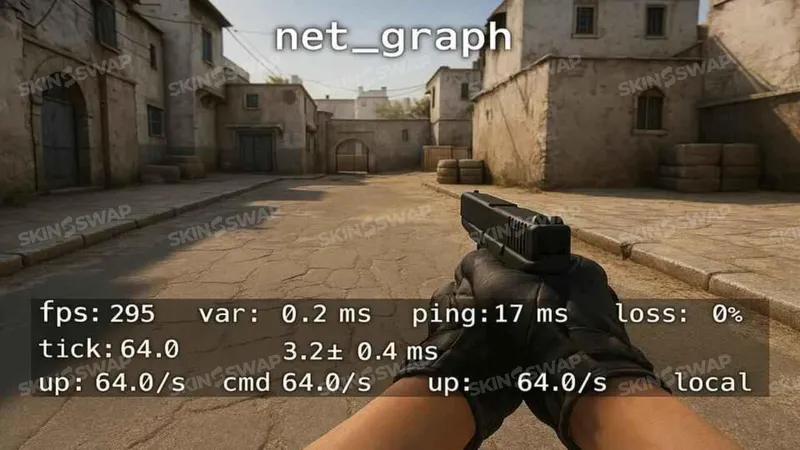
- Confusing cl_showfps with net_graph (the latter no longer shows FPS in CS2).
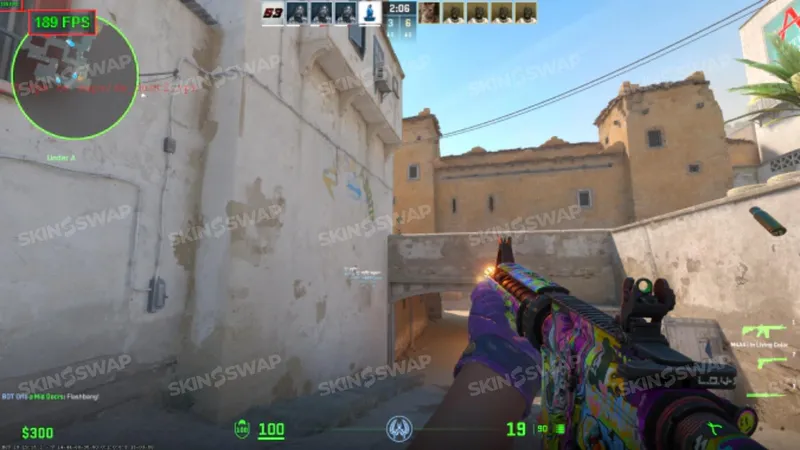
Using Telemetry in CS2 Settings
Valve’s new Telemetry replaces the need for “net_graph” in most casual cases and is easy to enable:
- Open the settings menu, then go to the game tab and select Telemetry.
- Find Show FPS Counter.
- Choose:
- Always: Shows FPS at all times.
- If conditions are poor: Displays only when FPS drops below a certain point (useful if you want a clean HUD but still monitor dips).
Telemetry can also show:
- Ping (latency to the server).
- Packet loss (important for diagnosing lag spikes).
- Server tick rate (e.g., 64 vs 128 tick).
Why choose Telemetry over the console?
- It’s persistent: you don’t have to re-enter a command every match.
- More flexible: you can combine FPS with other performance stats.
- Built into the CS2 interface: no extra tools needed.
Using Steam Built-In FPS Counter
Steps:
- Open Steam → Settings → In-Game.
- In the steam overlay settings, toggle In-game FPS counter.
- Choose position: top-left, top-right, bottom-left, or bottom-right.
- Optionally enable High contrast color for better visibility. The FPS counter will appear in-game through the steam overlay.
Advantages:
- Works for all Steam games, not just CS2.
- No need to touch CS2 settings.
- Easy to access and view FPS during gameplay using the steam overlay.
- Can combine with Telemetry if you want two data sources for comparison.
Drawbacks:
- Less customizable.
- May not match the exact FPS reading from in-game tools due to how Steam samples frames.
Using NVIDIA GeForce Experience Overlay
If you have an NVIDIA GPU, this is one of the most accurate and customizable overlays:
- Press Alt+Z to open the GeForce Experience overlay.
- Go to Settings → HUD Layout → Performance → FPS.
- Select where you want it on screen.
- Optionally add more metrics (GPU temp, CPU usage).
Why use NVIDIA overlay?
- Accurate real-time readings.
- Can monitor GPU bottlenecks alongside FPS.
- Works in games outside of Steam.
- Monitoring FPS helps ensure it matches your monitor’s refresh rate for optimal smoothness and responsiveness, allowing you to quickly identify performance drops and adjust settings before they impact your gameplay.
Using AMD Radeon Software Overlay
For AMD users:
- Open AMD Radeon Software.
- Navigate to Settings → Performance Overlay.
- Enable Show FPS.
- Customize what additional stats appear (e.g., GPU usage, temps).
Extra Commands and Parameters for FPS and Network Info
The Difference Between net_graph and cq_netgraph in CS2
In CS:GO, net_graph 1 was the Swiss Army knife of performance monitoring - it displayed FPS, ping, loss, var, and server tick rate in one overlay. With the shift to the Source 2 engine in CS2, Valve reworked this approach:
- net_graph 1 in CS2 no longer shows FPS.
- cq_netgraph 1 is now the go-to for network diagnostics: it displays latency, packet loss, choke, and server tick rate.
This change confused many returning players who expected the old command to work as before. The separation of FPS display (cl_showfps) and network stats (cq_netgraph) means you can now choose to display only what you need.
Example use case: If you’re experiencing rubberbanding or delayed hit registration, enable cq_netgraph 1 alongside cl_showfps 1. If FPS is stable but packet loss is high, the problem is likely your connection or the server, not your hardware.
Using cq_netgraph 1 for Network Stats
Command: cq_netgraph 1
Turns off with: cq_netgraph 0
What it shows:
- Ping (ms): round trip time to the server.
- Loss (%): percentage of packets lost in transmission.
- Choke (%): server not sending all packets due to congestion.
- Tick rate: server update frequency (important for competitive play).
Other Useful Commands for FPS Diagnosis
Performance-related console commands:
- fps_max X: Caps FPS to prevent overheating or input lag from extreme fluctuation. Recommended to set it 10–20 FPS above your monitor’s refresh rate.
- cl_disable_ragdolls 1: Removes ragdoll animations, freeing up CPU cycles.
- cl_detailfade 0: Lowers distant detail to reduce rendering load.
- mat_queue_mode: Controls threading for material system. Setting it to 2 can improve performance on multi-core CPUs.
Visual optimization:
- Lower shadows: r_shadowrendertotexture 0 (if allowed in competitive settings).
- Reduce particle effects: cl_particle_fallback_multiplier 0.5.
Binding a Key to Toggle FPS Counter
Typing a command every time is tedious. Instead, bind it to a key: bind n toggle cl_showfps 0 1.
- Replace n with any unused key.
- To set up the key bind, head to the console and enter the command.
- Pressing it switches the FPS display on and off instantly.
- Useful for streamers who want to hide FPS during recordings.
Making FPS Display Permanent
Adding the Command to Launch Options
Why it works: Launch options tell Steam to run commands automatically at game startup.
Steps:
- Open Steam Library.
- Right-click CS2 → Properties.
- In Launch Options, type: +cl_showfps 1.
- Close and launch CS2 - the counter appears without any extra steps.
Tip:
You can combine multiple commands: +cl_showfps 1 +cq_netgraph 1 +fps_max 240
Setting up autoexec.cfg
The autoexec.cfg file runs every time CS2 starts.
How to create:
- Navigate to your CS2 config folder:
Steam\steamapps\common\Counter-Strike Global Offensive\game\csgo\cfg - Create a new text file and name it “autoexec.cfg”.
- Add: cl_showfps 1
- Save and make sure Steam launch options include: +exec autoexec.cfg
Why use autoexec over launch options? It’s easier to manage multiple commands and make quick edits without touching Steam.
Keeping Telemetry Always On
If you prefer using CS2 in-game menu:
- Go to Settings → Game → Telemetry.
- Set Show FPS Counter to Always.
- This persists between sessions, so you don’t need commands or files.
How to Improve FPS in CS2
Graphics Settings for Stable FPS
CS2 visuals are more advanced than CS:GO’s, but many effects are non-essential for competitive clarity.
Key settings to lower:
- Global Shadow Quality: set to Low for big gains.
- Model/Texture Detail: Medium or Low depending on GPU.
- Shader Detail: Lower reduces GPU load without affecting visibility.
- Boost Player Contrast: Keep ON for visibility even if you lower other settings.
- Turn OFF: Motion Blur, VSync, Ambient Occlusion.
Console Commands for Optimization
- fps_max: Prevents GPU from pushing unnecessary frames that generate extra heat and power draw.
- cl_forcepreload 1: Forces the game to load assets before matches, reducing stutters.
- mat_disable_bloom 1: Removes bloom effect for cleaner visuals.
Important: Some commands may be restricted in official matchmaking - always check legality.
Hardware Upgrades for Higher FPS
If software tweaks aren’t enough:
- Upgrade GPU for higher rendering capability.
- Upgrade CPU if bottlenecked in smoke-heavy situations.
- Increase RAM to at least 16GB for smooth texture streaming.
- Install CS2 on an SSD to improve map load and reduce microstutters from asset streaming.
Reducing Overlay and Background Load
Overlays like Discord, Steam, or OBS can tax your system.
- Disable overlays you don’t use while playing.
- Close background apps consuming CPU/GPU time.
- Stream in lower resolution if using OBS to keep FPS steady.
Common Problems and Fixes
FPS Counter Not Showing
- Make sure the Developer Console is enabled.
- Check the spelling of cl_showfps.
- Ensure no conflicting overlay is hiding the counter.
Console Commands Not Working
- Ensure Dev Console is enabled.
- Some commands are disabled in certain modes - test in an offline lobby first.
Telemetry Not Displaying FPS
- Might conflict with GPU overlays; disable extras to test.
- Sometimes resets after updates - re-enable in settings.
FPS Drops After Enabling Counter
- The counter itself is lightweight; drops are likely from overlays like GeForce or Radeon showing extra metrics.
- Limit visible data to essentials.
Final Thoughts
FPS visibility is a must-have for anyone who takes CS2 seriously. Whether you choose the minimal console approach, the flexible Telemetry system, or a detailed GPU overlay, the goal is the same: keep your frames high and stable.
For best results, combine FPS monitoring with optimization:
- Adjust in-game settings for clarity and performance.
- Keep your drivers updated.
- Minimize background load.
With the right setup, you’ll ensure every peek, spray, and clutch plays out as smoothly as your skill allows.
CS2 FPS FAQ
How Do I Quickly Turn Off the FPS Counter?
Console: cl_showfps 0. Bind: bind key toggle cl_showfps 0 1.
Can I Change the Color or Size of the FPS Counter?
Not via cl_showfps, but Steam counter has a high-contrast option. GPU overlays often allow full color customization.
How Do I Check if an FPS Display Is Accurate?
Compare cl_showfps with GPU overlay numbers. Minor differences are normal due to sampling methods.
How to Enable FPS on a Laptop with Dual GPUs
Set CS2 to use the high-performance GPU in NVIDIA/AMD control panels. Use Windows Power Options → High Performance mode.
