Best CS2 Crosshair Codes (2025 Update)
The best crosshair codes used by top professional players around the world can elevate your gameplay by allowing you to replicate the setups of the world’s best. Importing these codes gives you access to proven configurations that can help you improve your accuracy and comfort.
Why Your CS2 Crosshair Matters in 2025
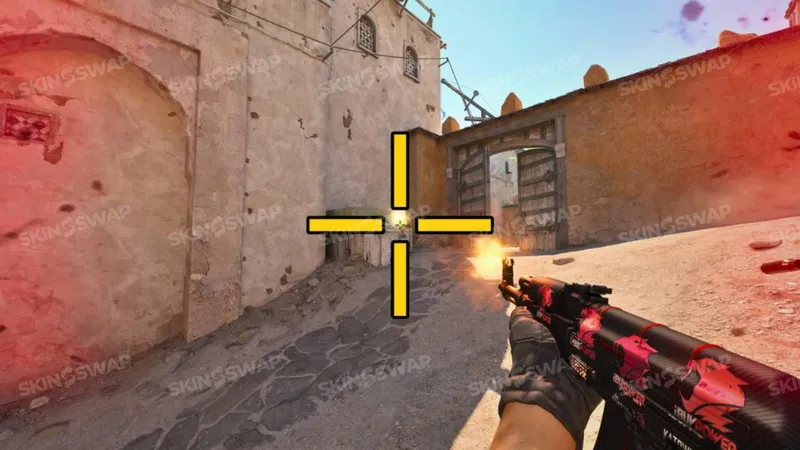
In CS2, milliseconds decide whether you win or lose a duel. Choosing the right crosshair is crucial for improving your accuracy and overall performance. A crosshair that fits your playstyle can give you the visual clarity and consistency needed to react faster and more accurately. It’s one of the few settings that directly influences your in-game mechanics without changing the game’s core rules.
A poorly chosen crosshair can create blind spots, distract your focus, or even slow down your muscle memory development. On the other hand, a well-optimized crosshair blends seamlessly with your reflexes, letting you focus on positioning, recoil control, and strategy.
The Role of a Crosshair in Aim Precision
Your crosshair is the visual bridge between your eyes and your hand-eye coordination.
- Pre-aiming and headshots: In competitive play, most kills come from precise pre-aiming rather than reactive shooting. A reliable crosshair makes lining up shots at heads for headshots almost automatic.
- Spray control: When you practice recoil patterns, your crosshair gives you instant visual feedback on whether you’re compensating correctly.
- Consistency: Muscle memory is key in FPS games. Constantly changing your crosshair disrupts that muscle memory, forcing you to re-learn your aim habits.
Professional players often stick to the same setup for months - sometimes years - unless they’re deliberately experimenting during bootcamps.
Crosshair Customization in CS2 vs CS:GO
If you’re coming from CS:GO, you’ll notice CS2 has taken customization to a new level:
- Built-in share/import feature: You can paste a pro player’s crosshair code directly into your game settings - just open the game settings menu, find the crosshair section, and paste the code. No need for console commands or third-party maps.
- Improved rendering: Source 2’s engine makes crosshairs sharper and more visible, even at lower resolutions.
- Expanded color options: CS2 offers better RGB customization and more preset colors, helping you find a crosshair that stands out on all maps.
- Telemetry integration: You can now combine crosshair tuning with in-game performance stats to see how changes impact your accuracy.
The transition from CS:GO also means you can carry over old codes, but many players are optimizing for CS2’s new visuals and color palette.
Types of CS2 Crosshairs Explained
Before copying a pro’s settings, it’s important to understand the core crosshair types and which playstyles they suit best. The main difference between static and dynamic crosshairs is that static crosshairs remain unchanged while moving or shooting, providing a consistent aiming point, whereas dynamic crosshairs expand or contract based on movement and firing, giving visual feedback but potentially distracting from precise aiming. Choosing the wrong type can make aiming harder, even if it looks “cool” on someone else’s stream.
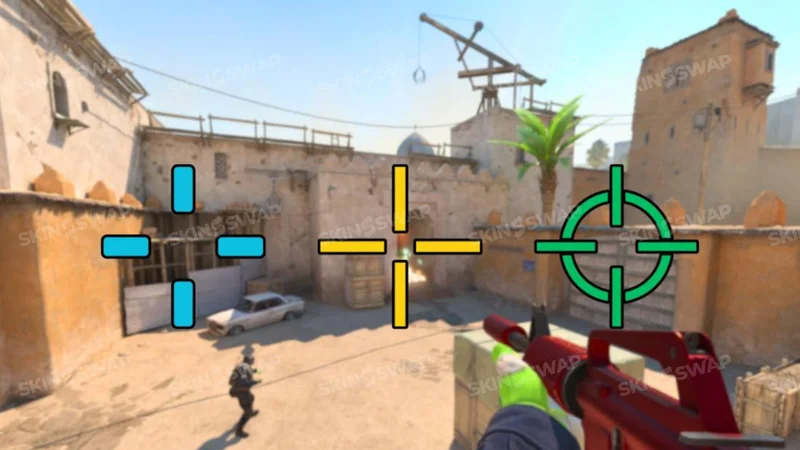
Static vs Dynamic Crosshairs
- Static crosshair: The lines stay fixed no matter what you’re doing. This is the most popular choice among pros because it keeps your point of aim stable, allowing your brain to focus on alignment rather than animation. Most pros prefer static crosshairs for better spray control and consistency during gameplay.
- Dynamic crosshair: The crosshair expands and contracts as you move or shoot. It’s useful for beginners to see how movement affects accuracy, but it can be distracting for high-level play.
Dot and Hybrid Styles
- Dot: A single, small point in the center. Favored by AWPers and players with strong micro-adjustment skills. It offers maximum visibility around the target but demands perfect crosshair placement.
- Hybrid: Combines a central dot with short lines around it, giving both pinpoint aim and spatial reference. This is a good middle ground for riflers who occasionally pick up the AWP.
Special Options - T-Style, Follow Recoil, Color Contrast
- T-Style: Removes the top horizontal line, giving you an unobstructed view above your aim point. Some entry fraggers like this for better head visibility when spraying upwards.
- Follow Recoil: Make the crosshair move in sync with your weapon’s recoil pattern. This is mainly for training purposes, as it can be distracting in matches.
- Color Contrast: High-contrast colors like cyan, magenta, or bright yellow help your crosshair stand out on all maps. Avoid colors that blend into common textures - for example, green can disappear against Mirage’s B site foliage.
Many professional AWPers prefer the default crosshair for its simplicity and precision, as it provides a clear and compact aiming reticle that is effective in competitive play.

Best CS2 Crosshair Codes from Pro Players (2025)
One of the fastest ways to find a good crosshair is to copy a professional player’s setup. These pros have tested their crosshairs under intense tournament conditions, refining them for maximum efficiency.
The list below features pro crosshairs used by top players in 2025, allowing you to try the same optimized setups as the pros.
Below is a curated selection of verified CS2 crosshair codes from top players in 2025, grouped by role. All codes can be pasted into CS2’s “Share or Import” menu.
Riflers’ Favorite Crosshairs
NiKo (Falcons Esports)
- Style: Static, small gap, green color with outline.
- Best for: AK-47 and M4 headshot tapping.
- Code: CSGO-kZkD4-G77rV-a7v9E-TyFQd-vJ3FQ
ropz (Vitality)
- Style: Tight gap, cyan, no outline.
- Best for: Precise headshots and quick bursts.
- Code: CSGO-HaP2F-zKc3t-mhY7a-Ba2pD-XbFvQ
b1t (NAVI)
- Style: Medium size, high-visibility cyan.
- Best for: Clearing corners quickly and multi-frags.
- Code: CSGO-pO9k3-B6rV2-Hp8Lc-9zTmD-YRqQH
AWPers’ Precision Crosshairs
s1mple (NAVI)
- Style: Small dot + thin lines, green, no outline.
- Best for: Flick shots and holding angles, ideal for an AWPer.
- Code: CSGO-u8LmV-Mo2Pr-aK5n3-4w7Fs-pbVjD
ZywOo (Vitality)
- Style: Cyan dot with micro-lines, high clarity.
- Best for: Aggressive AWPing and hybrid rifle/awp plays, suitable for AWPers.
- Code: CSGO-FzP2Q-jN8Vr-kG4Yb-3v9Ht-q6pLp
m0NESY (Falcons Esports)
- Style: Slightly larger dot, short lines, yellow.
- Best for: Players switching between AWP and rifle mid-round, often used by AWPers.
- Code: CSGO-Kt3cV-Nx5pB-Hm6yL-9j4Pr-a8LpR
Entry Fraggers and Aggressive Setups
donk (Team Spirit)
- Style: Thick lines, wide gap, bright magenta.
- Best for: Fast rushes and instant target acquisition, ideal for an aggressive playstyle.
- Code: CSGO-Qx2k7-mD3rP-Ba4Lq-2pV7T-nj6FZ
Twistzz (FaZe Clan)
- Style: Static, medium gap, bright green.
- Best for: Balanced aggressive and passive roles, supporting an aggressive playstyle when needed.
- Code: CSGO-p6qKj-Rb4tV-aH7yW-Kz8Lp-Yc2vN
XANTARES (Aurora Gaming)
- Style: Yellow static crosshair, thin lines.
- Best for: High-precision rifling with fast peeks, suiting players with an aggressive playstyle.
- Code: CSGO-Vx2pB-jL8rM-tQ4Fh-7nYkD-wm6ZJ
Support Players’ Visibility-Focused Crosshairs
Magisk (Astralis)
- Style: Larger lines, white, with outline for smoke visibility.
- Best for: Holding anchors and spray control in dense fights.
- Code: CSGO-wP2sN-Ht4pQ-Lk9mD-a7xVr-Kb6Lp
apEX (Vitality)
- Style: High-contrast white crosshair, static.
- Best for: Supportive play, utility usage, and covering teammates.
- Code: CSGO-mQ3vB-kp8Rj-Nt7Yc-4hLpZ-Wb2Fr
Perfecto (Virtus Pro)
- Style: Cyan with black outline, medium size.
- Best for: Consistency across bright and dark map areas.
- Code: CSGO-Bx9pT-Rc6nV-kF2yH-Lj7Pr-Pm5wQ
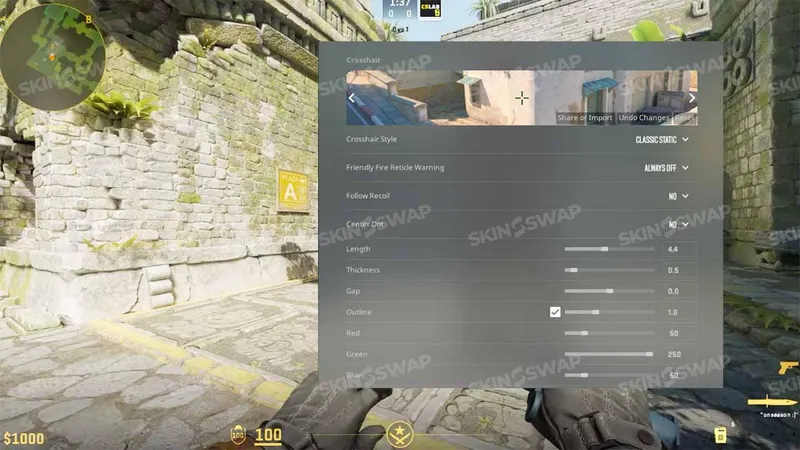
Universal Crosshair Presets for Any Playstyle
While copying a pro’s crosshair can give you a head start, not every player wants to commit to someone else’s exact settings. These universal presets are inspired by the latest crosshairs used by pros and are perfect for trying new crosshairs based on recent trends. Below are three tried-and-tested universal presets designed to suit different skill levels and playstyles.
The All-Rounder Preset
Specs:
- Size: 2.5
- Gap: -2
- Thickness: 0.5
- Color: Cyan or green
- Outline: On, thickness 1
- Alpha: 255 (fully opaque)
Why it works: This balanced setup offers enough visibility for spotting enemies quickly while staying small enough for accurate aim. Works for rifles, pistols, and SMGs - a great choice for players who switch roles often.
High-Visibility Preset for Beginners
Specs:
- Size: 3.5
- Gap: 0
- Thickness: 1
- Color: Bright yellow or magenta
- Outline: On, thickness 1
- Alpha: 255
Why it works: The larger size and thicker lines help new players stay aware of their aim point even in chaotic firefights. Perfect for learning recoil control and tracking moving targets.
Minimal Distraction Preset for Pros
Specs:
- Size: 2
- Gap: -3
- Thickness: 0.5
- Color: White or cyan
- Outline: Off
- Alpha: 200–230 (slightly transparent)
Why it works: Designed for players with strong crosshair placement habits, this minimal setup offers an unobstructed view of the target while keeping precision at its peak.
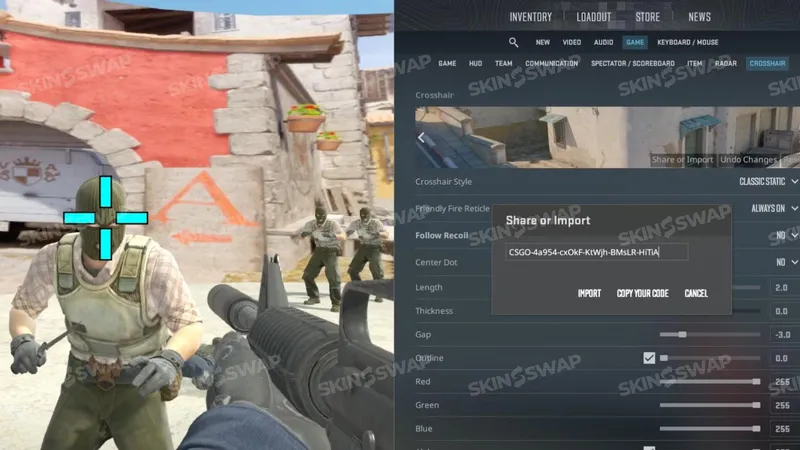
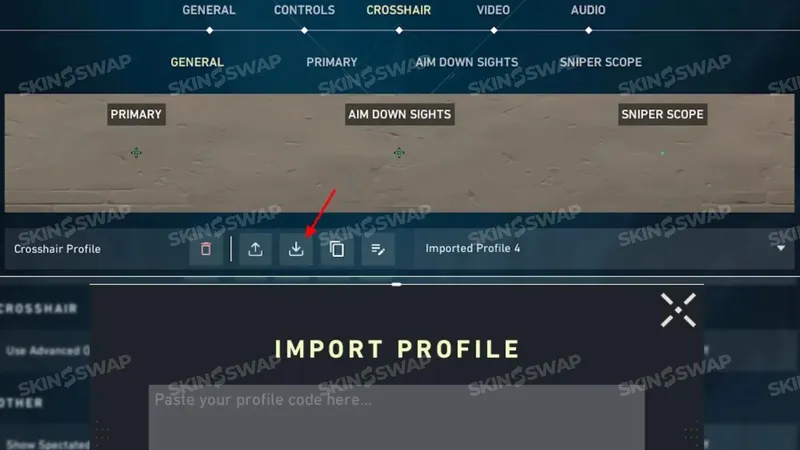
How to Import Crosshair Codes in CS2
Importing a crosshair in CS2 is quick and straightforward. Starting from the home screen, access the settings menu by clicking the cog icon on the left. You have two main options - via the in-game menu or using console commands.
To import a crosshair code using the in-game menu, navigate to the crosshair options in the settings menu, paste your code, and click import to apply it. You can also preview your crosshair before finalizing the import.
Importing via the In-Game Menu
- Open Settings from the main menu.
- Navigate to the Game tab.
- Select the Crosshair section.
- Click on Share or Import.
- Paste your desired code (e.g., CSGO-p6qKj-Rb4tV-aH7yW-Kz8Lp-Yc2vN).
- Press Import and your crosshair will instantly update.
Importing via Console Commands
- Enable the developer console in Settings → Game → Enable Developer Console (~).
- Open the console with the tilde key (~).
- Use commands like:
- cl_crosshairsize “2”
- cl_crosshairgap “-2”
- cl_crosshairthickness “0.5”
- cl_crosshaircolor “5” (custom RGB)
- Press Enter to apply each change.
This method is best for fine-tuning specific parameters without re-importing an entire code.
Testing on the Crash Crosshair Generator Map
The Crashz Crosshair Generator is a popular Steam Workshop map designed to help players test and tweak crosshairs.
- You can instantly swap between hundreds of pro presets.
- The map includes live target scenarios to see how your crosshair feels during movement, spraying, and peeking.
- You can also test visibility on different textures and lighting conditions.
- While playing different scenarios on the map, you can test your crosshair to see how it performs in real gameplay situations.
Choosing the Right Crosshair for Your Playstyle
No single crosshair fits everyone. Your choice should reflect your role, weapon preferences, and even your monitor setup.
Factors to Consider - Role, Weapon Preference, Sensitivity
- AWPers: Smaller crosshairs or dots are preferred for precise flicks and scope alignment.
- Riflers: Medium-sized static crosshairs help balance tapping and spraying.
- Entry Fraggers: Bright colors with slightly wider gaps make target acquisition faster in chaotic fights.
- Sensitivity settings: High sensitivity players often use smaller crosshairs for precision, while low sensitivity players might prefer slightly larger ones for visibility.
Color Theory in CS2 Crosshairs
- Use high-contrast colors like cyan, pink, or yellow for better visibility on most maps.
- While a green crosshair is highly visible and popular among many players for its effectiveness, avoid using green on Mirage B site or Ancient due to blending with foliage.
- Avoid blue on maps like Overpass, which have large blue/grey backgrounds.
- Consider enabling an outline for extra contrast against light or dark backgrounds.
Adjusting Size and Gap for Visibility and Accuracy
- Smaller size: More precision but requires better aim discipline.
- Larger size: Easier to track moving targets but can block small enemy models at range.
- Gap settings: Smaller gaps help with pinpoint accuracy, while wider gaps improve visibility of long-range targets.
Crosshair Optimization Tips for Competitive Play
Even with a solid preset, small adjustments can improve your consistency in ranked or pro-level matches. Optimizing your crosshair can have a significant impact on your gameplay, helping you perform better and react faster in competitive situations.
Pairing Your Crosshair with Sensitivity Settings
- High sensitivity: Smaller crosshairs help maintain control during micro-adjustments.
- Low sensitivity: Slightly larger crosshairs keep your aim point visible during wide flicks.
Test by running a 30-minute aim routine with bots after each change.
Using Recoil Patterns and Practice Maps
- Match your gap size to your spray control style - too small and it’ll block visual recoil cues.
- Use recoil training maps to fine-tune your gap and thickness until the spray pattern feels comfortable.
Adapting Crosshair for Different Resolutions and Aspect Ratios
- 4:3 stretched: Makes the crosshair appear wider - you may need to adjust size and gap.
- 16:9: Keeps proportions true to settings.
- Always test on your native resolution before making final adjustments.
Common Mistakes When Setting Up a Crosshair
Even experienced players can sabotage their aim by choosing poor settings.
Overcomplicated Designs That Block Vision
- Crosshairs with too many lines, large outlines, or bright fills can obstruct your view of the enemy’s head.
- Stick to clean, simple designs that keep your focus on the target.
Using Low-Contrast Colors
- A crosshair that blends into the environment can cause you to lose track during key moments.
- Always test on multiple maps before committing to a color.
Constantly Changing Without Adaptation Time
- Changing your crosshair daily prevents muscle memory from developing.
- Give yourself at least 1–2 weeks with the same setup before making small adjustments.
Thoughts on Best CS2 Crosshair Codes in 2025
A well-chosen crosshair is one of the simplest yet most impactful changes you can make in CS2. Some pro players’ crosshairs are so iconic that many players recognize them instantly. While copying pro players is a great starting point, the best crosshair for you is one that feels comfortable, stays visible in all situations, and supports your playstyle.
Experiment on practice maps, test different colors and sizes, and once you find a setup that works - stick with it. The key to better aim isn’t just in the crosshair itself, but in the consistency and confidence it helps you build.
FAQ
Do Pro Players Change Crosshairs Often?
Some pros experiment during practice, but most stick to one setup for consistency during tournaments.
What’s the Best Crosshair for Headshots?
Small static crosshairs or dot crosshairs are generally favored for precise head-level aim. The best crosshairs for headshots are often those used by professional players, as they are designed for precision and have been tried and tested in competitive play.
Can I Copy Any Pro Crosshair and Be Better Instantly?
No. While copying can give you a good base, your personal comfort and practice matter more than the settings themselves. Improvement comes from playing and practicing with the crosshair, not just copying it.
How to Reset to the Default CS2 Crosshair?
Go to Settings → Game → Crosshair → Reset to Default or remove custom console commands.
