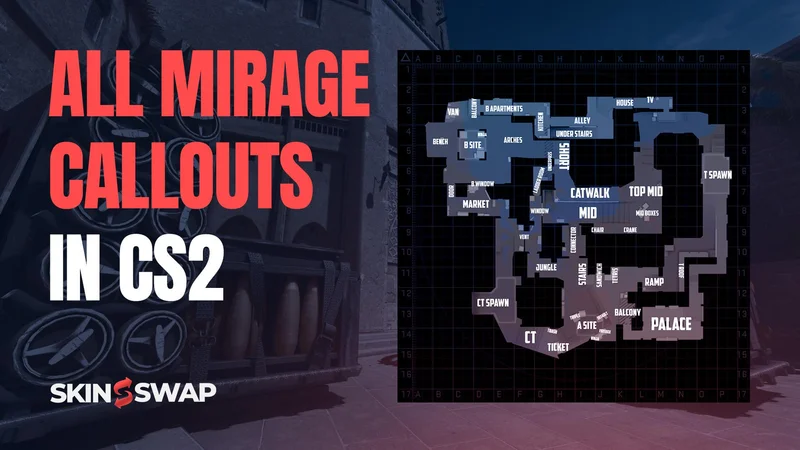
All Mirage Callouts in Counter-Strike 2
A callout is a shorthand name for a specific location on the map. Instead of saying, “The enemy is hiding in the corner next to the boxes near A Ramp,” a player simply says “One Firebox” or “One Ramp.” These short, precise commands save time, prevent confusion, and allow teammates to react instantly. The faster the communication, the better the chances of survival.
Why Learning Mirage Callouts Matters
Even if you have the sharpest aim or the fastest reaction times, failing to call out enemy positions in time can cost your team the round. Let’s break down why callouts matter so much on Mirage:
- Team Communication: Short and clear callouts let teammates know exactly where threats are. For example, “Two Palace” immediately warns defenders to expect pressure from above A Site, while “AWP Window” alerts your team that Mid control is being contested.
- Tactical Coordination: Mirage is a map built on timing and rotations. Executing a coordinated A Split (attack from Ramp, Palace, and Connector at once) is only possible when everyone uses the same vocabulary.
- Reaction Time: A callout is faster than a long description. Instead of saying “The guy is hiding in the corner under Balcony at A,” just saying “Shadow” gives your teammates an instant picture.
- Esports Standardization: Watch any professional CS2 match and you’ll hear casters and players use these exact callouts. Learning them not only helps you in your own games but also makes it easier to understand pro strategies and adapt them.
- Rank Climbing: In matchmaking or FACEIT, one player with strong communication can often carry the team. Clear callouts reduce mistakes, help with rotations, and build trust among random teammates.
General Overview of Mirage Map
The map is divided into three main combat zones - A Site, Mid, and B Site - with rotational connectors tying everything together. Understanding this flow is critical, because Mirage is all about timing: the faster you rotate or cut off a path, the more control your team has.
- T Spawn: Where the Terrorists start. From here, players can split into three main paths: towards A through Ramp/Palace, towards Mid via Top Mid and Underpass, or towards B through Apartments.
- CT Spawn: Where the Counter-Terrorists start. CTs rotate quickly from here to either A or B Site, and it also connects to Jungle (A) and Market (B).
- A Site: Located on the far right side from T Spawn, this site features iconic choke points like Ramp, Palace, and Jungle.
- Mid: The heart of Mirage. Whoever controls Mid usually controls the round, since it gives direct access to both bombsites. The raised Window position (also known as the sniper’s nest) offers a commanding vantage point over Mid, making it a key spot for map control.
- B Site: Situated on the left from T Spawn, it is harder to enter but easier to defend. Rotations from Market and Catwalk are crucial here.
CT Spawn
This area is not just where players begin, but also a strategic point for regrouping and launching retakes on both A Site and B Site. The surroundings of CT Spawn, including the iconic Ticket Booth, Trash, and Jungle, offer a variety of defensive positions that allow players to control key sightlines and choke points.

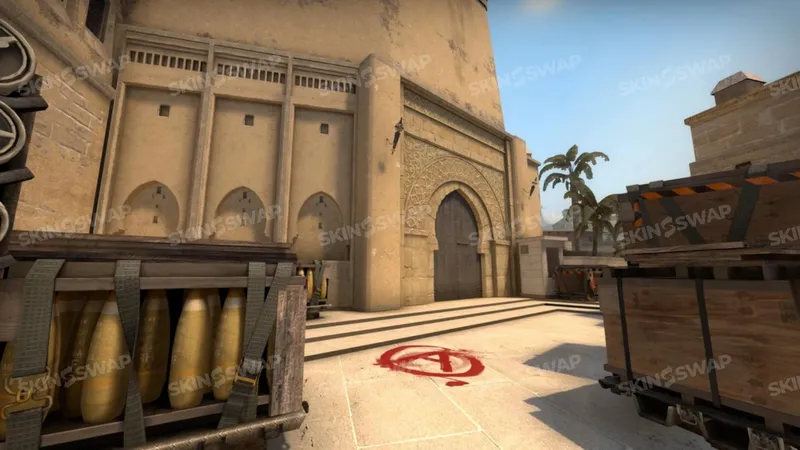
A Site Callouts
A Site is one of the most iconic parts of Mirage, often the focal point of both early rushes and late-round executions. Knowing every callout on this site is critical for both attackers and defenders.
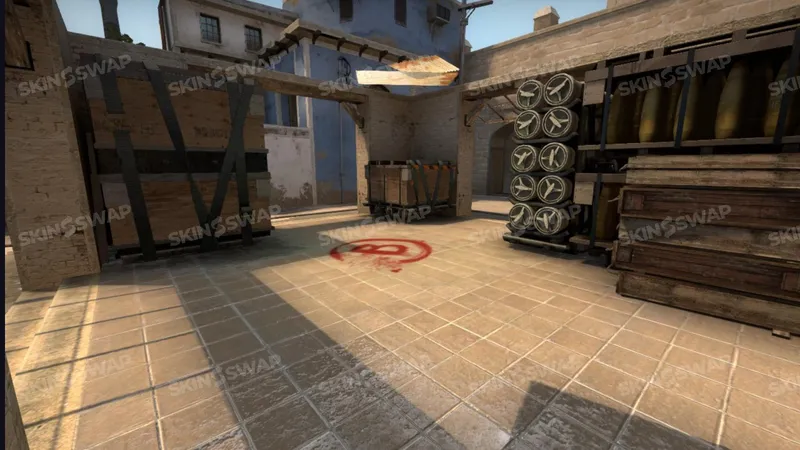
- Triple Boxes / Tetris: This is the set of boxes near A Ramp, commonly called out by players as ‘Tetris’. It refers to the group of stacked boxes that provide cover and are a key position for both attackers pushing from A Ramp and defenders holding the site.
Entry Points and Approaches
- T Roof: The staging ground where Terrorists prepare their A pushes. From here, Ts can line up utility smokes and flashes before committing.
- A Ramp: The main downhill pathway into A Site. One of the most contested entry points, it’s a key angle for both Ts and CTs.
- Palace / Balcony: The elevated building overlooking A Site. Players can either hold angles from here or drop onto Balcony to surprise defenders.
Core Positions on A Site
- Default Plant Spot: The most common place to plant the bomb, easily covered by teammates from Ramp or Palace.
- Triple Boxes / Tetris: Large stacked boxes providing cover; Ts often use this to gain ground or CTs to hold angles.
- Firebox: The back corner of A, infamous for players hiding during executes. A simple molotov clears this instantly.
- Ninja: A sneaky corner near Default where defenders sometimes hide for last-second defuses.
- Sandwich: The narrow space between Ramp and Stairs, a deadly close-range angle. This small area is frequently used for cover or ambushes.
- Shadow (Under Palace): Dark corner beneath Palace Balcony. CTs often hide here to catch unsuspecting attackers in this small area.
- Pillars: Structural beams around the site that provide partial cover.
Supporting Areas
- CT Spawn / CT: The defensive spawn exit facing A, where AWPs frequently hold Ramp.
- Jungle: A connector room between Mid and A, allowing quick rotations.
- Connector: A vital choke linking Mid control directly to A Site.
- Stairs: Overlooking Ramp, perfect for CT defenders to watch pushes.
- Ticket Booth: Positioned outside CT, offering a powerful AWPing angle into A Ramp.
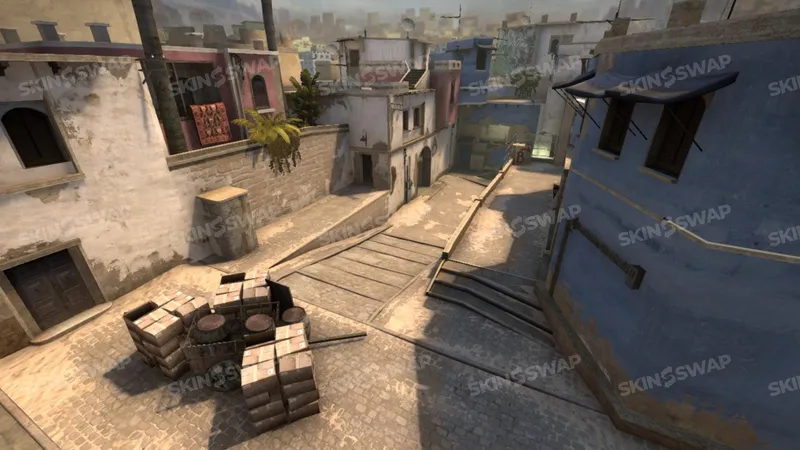
Mid Control Callouts
If A and B Sites are the end goals, Mid is the highway that connects them. Control of Mid often determines who wins a round on Mirage. Securing Mid allows Terrorists to split either bombsite, while Counter-Terrorists must constantly fight for vision and information.
- Catwalk / Short: The path leading from Mid to B site, often called ‘Short.’ This is an upper area, providing an elevated position and strategic vantage point for controlling rotations and engaging enemies.
- Ladder Room: A small room connecting Mid, Catwalk, and B Apartments. Ladder Room is also considered an upper area, offering elevation and a strong position to contest Mid or support B site.
Main Areas
- Mid (Center): The wide open area that serves as the battleground between T and CT forces. It is overlooked by Window, Connector, and Catwalk, making it one of the most contested areas in CS2.
- Top Mid: The Terrorist entry point into Mid, usually where Ts throw their first smokes and flashes. Holding this area is essential for map control.
- Mid Boxes: Cover spots in the center that Ts use to challenge Window and Catwalk. Winning duels here opens up the map.
- Chair / Boost Spot: Located near Top Mid, this is a small perch where Ts can boost to peek Window or Connector angles. It’s a classic default play for early picks.
Key Power Positions
- Window / Sniper’s Nest: A dominant AWPing spot for CTs. From here, defenders can watch Mid and pick off attackers trying to cross. Because of its importance, it is almost always smoked by Ts at the start of the round.
- Connector: One of the most valuable positions in the game, giving direct access from Mid to A Site. Controlling Connector allows Ts to perform devastating A Splits.
- Catwalk / Short: The raised pathway leading from Mid towards B Site. This position lets CTs rotate quickly and enables Ts to pressure B from Mid.
- Ladder Room: A small room that offers tactical advantages for cover and ambush, connecting Mid with B Apartments. It’s often used by CTs to control Catwalk and deny Ts from splitting B.
Lower Mid
- Underpass: A tunnel connecting Top Mid to the entrance near B Apartments. It allows Ts to surprise CTs from below or rotate safely without being spotted.
- Entrance to Mid from T Side: The chokepoint where Ts first arrive. Early grenades here often decide whether Ts gain or lose Mid control.
Controlling the Mid is like holding the steering wheel of a Mirage. Without it, CTs become reactive and Ts gain full freedom to dictate the round.
Ladder Room
The Ladder Room and Underpass are two of the most dynamic and influential areas on the Mirage map, offering players a range of tactical options for both attack and defense. The Ladder Room, a small but vital space, connects directly to the Sniper’s Nest (Window) and provides access to B Short (Catwalk) and B Apartments. This position is often used by Counter-Terrorists to control Mid and support B Site, or by Terrorists looking to surprise defenders with a quick boost or flank.
B Site Callouts
B Site is often considered harder to execute on because of its tight entry points, but once the bomb is planted, it becomes a fortress for attackers. For defenders, B is about strong anchors and fast rotations from Market and Short.
- Kitchen: This area, also known as ‘behind’ B Site, is a key defensive position for players rotating from CT Spawn. Communicating that an opponent is ‘behind’ B Site typically refers to someone holding or retaking from Kitchen.
Entry Points
- Apartments (Apps): The long hallway that Terrorists use to approach B. Ts usually stack utility here before committing.
- B Halls: The area just before Apartments, often used as a staging ground for pushes.
- TV Room: A safe room where Ts can regroup and line up nades before pushing Apps.
- B Ramp: The narrow downhill approach into the site, where many early fights happen.
Core Positions on B Site
- Default Plant Spot: The standard place to plant the bomb, covered from Apartments or Short.
- Bench: A sneaky defensive position. Players often crouch here to catch Ts entering from Apps.
- Van / Car: The iconic defensive cover spot. CTs frequently hold here with rifles or AWPs.
- Back Site: The far corner of B, often used for plants when Default is unsafe.
- Pillars: Provide cover in the middle of the site. Useful for delaying pushes or defending the bomb.
- Short Corner: The CT holds position from Catwalk. Players here can deny a plant or support site anchors.
Supporting Areas
- Market (Door, Window): CT rotation hub into B. Market Window allows vision into the site, while Market Door enables direct retake pressure.
- Kitchen: The room adjacent to Market, connecting deeper into B defenses.
- Arches: Curved entryways leading from Kitchen into the bombsite.
Rotational Paths and Supporting Zones
Mirage is not only about holding bombsites - it is also about knowing how to rotate between them. The map’s rotations are relatively fast, meaning a single callout can trigger immediate movement across the map. Understanding these pathways allows teams to react quickly and maintain control.
- Underground (Underpass): A tunnel connecting Top Mid to B Apartments. This is one of the most flexible routes for Ts, letting them rotate between Mid control and B executes without being seen in open space.
- Jungle: A room connecting Mid with A Site. Jungle is vital for CTs when retaking A and is often smoked by Ts during A splits.
- Short (Catwalk): The elevated path leading from Mid into B. CTs rely on Short to rotate fast, while Ts often use it for split executions on B.
- Kitchen → Market: Essential CT rotation hub for B retakes. Without Market control, retaking B becomes almost impossible.
- CT Spawn: The Counter-Terrorist spawn connects A and B rotations. Losing control of this area during an execution usually results in a lost round.
Counter-Strike 2 Updates: Mirage Changes
With the launch of Counter-Strike 2, Mirage has received several important updates that impact how players approach the map and use callouts. One of the most notable changes is the adjustment to bomb plant zones on both A Site and B Site. These revised plant areas force teams to rethink their default strategies, as new plant spots can offer better cover or different post-plant angles, making site control and retakes more dynamic.
Common Mistakes and How to Avoid Them
Even players who know callouts sometimes make critical errors that cost their team rounds.
- Using wrong or made-up names: Calling “Balcony” when you mean “Palace” confuses teammates. Stick to standard names.
- Overexplaining instead of calling: Long sentences waste time. Replace “He’s hiding in that corner under the wooden platform” with “Shadow.”
- Not calling in clutch moments: Some players go silent when nervous. Always give info before dying.
- Mispositioning due to misunderstood terms: Not knowing the difference between Jungle and Connector can cause rotations to fail.
| Callout | Zone | Description |
|---|---|---|
| T Spawn | Spawn | Terrorist starting point |
| CT Spawn | Spawn | Counter-Terrorist starting point |
| Ramp | A Site | Main T entry onto A |
| Palace/Balcony | A Site | Elevated entry into A |
| Shadow | A Site | Corner under Palace |
| Firebox | A Site | Back corner, common CT hold |
| Triple/Tetris | A Site | Box stacks near plant spot |
| Sandwich | A Site | Gap between Ramp and Stairs |
| Stairs | A Site | Elevated hold facing Ramp |
| Jungle | A Site | Connector room between Mid and A |
| Ticket Booth | A Site | CT AWPing position outside site |
| Mid | Mid | Central control zone |
| Top Mid | Mid | T entry point to Mid |
| Window | Mid | Sniper’s Nest for CT AWPers |
| Connector | Mid | Link between Mid and A |
| Catwalk/Short | Mid | Path from Mid to B |
| Ladder Room | Mid/B | Small connector to B Apartments |
| Underpass | Mid/B | Tunnel linking Mid and B |
| Apartments | B Site | T entry corridor into B |
| TV Room | B Site | Safe staging area before Apps |
| B Ramp | B Site | Narrow approach into B |
| Bench | B Site | Defensive angle next to site |
| Van/Car | B Site | CT anchor position |
| Back Site | B Site | Deep plant area |
| Pillars | B Site | Cover inside B Site |
| Market | B Site | CT rotation hub with window and door |
| Kitchen | B Site | Room connected to Market |
| Arches | B Site | Entryways from Kitchen into site |
Conclusion
Mirage remains one of the most iconic and competitive maps in Counter-Strike 2, and mastering its callouts is the fastest way to improve communication, teamwork, and overall performance. By learning the names of every position on A, Mid, B, and the key rotational paths, players can react quicker, coordinate strategies more effectively, and gain a decisive edge in ranked play or tournaments. Clear, consistent callouts transform individual skill into team victories, making them just as important as aim or utility usage.